lunes, 28 de diciembre de 2015

New Zealand - Fiorland - Lake Marian

Track Description / Características de la Ruta:

Distance / Distancia: 2.87km (one way)
Elevation Gain / Ascenso: 391m
Max / Min Altitude:  751m / 362m
Difficulty / Dificultad: Medium / Media
Alpine Grade: S.D. (Sin dificultad)
Activity: Hiking / Senderismo 
Recommended Cartography / Cartografía Recomendada: 


On our way to Fiorland, in the South Island, the road from Te-Anau to Milford is plenty of beautiful hikes which can be finished in just a few hours. A few kilometers before crossing Homer Tunnel, we stopped to see Marian Lake, a one-hour (one-way) hike which will take us to this amazing glaciar lake carved by the ice between the two walls of granitic rocks years ago. // De camino a la región de los Fiordos, en la isla del sur, en la carretera de Te-Anau hasta Milford podemos encontrar un montón de rutas maravillosas y que se realizan en unas pocas horas. Unos pocos kilómetros antes de pasar el Tunel de Homer, paramos para hacer la ruta del Lago Marian, una ruta de una hora (sólo ida) que nos lleva a un encajonado lago glaciar tallado por el hielo entre dos paredes graníticas.


Fiorland is a maze of glaciar valleys and low mountains, carved by the ice during thousands of years, with a very dense native forest. Everywhere you look at, you get an amazing 360-degrees view of this beautiful landscape. The endangered species of birds, such as Kea, find in this forest a shelter from their predators. // La región de los Fiordos es un laberinto de valles glaciares y montañas bajas, labrado por el hielo durante miles de años, con unos densos bosques nativos. En cualquier sitio donde estés, tienes unas preciosas vistas 360 grados de este grandioso paisaje. Las especies de aves amenazadas como la Kea encuentran en estos bosques un refugio contra sus depredadores.


From the parking place, it is just a one-hour easy walk to Lake Marian. The terrain is not very challenging, but after rainy days, it might be slippery and muddy. Also, although it is correctly marked, there are a few sections of the path which might lead to confusion, so, watch out not to get away from the path. As the intuition might tell us, the lake is located inside the U-shape hanging glaciar valley we see in the image bellow. // Desde el parking tenemos una hora para llegar al Lago Marian. El terreno no es muy técnico, pero después de días lluviosos puede ser resbaladizo y embarrado. También hay que reseñar que, aunque esté marcado, hay algunas secciones que pueden ser un poco confusas, así que hay que estar atento todo el rato a las marcas del camino. Como la intuición nos dice, el lago está localizado dentro del valle glaciar colgado en forma de U, como muestra la imagen de abajo.


 The first hundreds meters of the track has been conditioned so that tourist can visit  this section of the water stream forming small waterfalls.  // Los primeros metros del recorrido están acondicionados con pasarelas de madera para que los turistas puedan ver el arroyo y las cascadas que forma.


After a few hundreds meters, the conditioned path finishes, and we have to walk in a steep path in the middle of the forest. // Después de unos pocos metros el acondicionamiento del camino termina, y tenemos que andar en un camino empinado en el medio del bosque.


The forest is very dense, and the hanging valley is very narrow, so, during the trek we do not have the chance to get a lot of promising pictures. However, once we reach the upper-level of the hanging valley, we see Marian Lake between the walls of granite rocks. // El bosque es bastante denso, y el valle colgado bastante estrecho, así que durante el camino de subida no hubo oportunidad de echar muchas fotos. Sin embargo, una vez llegamos a la parte alta del valle colgado, la vista del Lago Marian entre las dos paredes de granito es espectacular.


The way back is done exactly through the same path. Observe that the GPX track is only one-way, so, to correctly plan for the activity, multiply distance and time by a factor of 2. // El camino de vuelta se hace por el mismo camino. Observad que el track GPX que he colgado es sólo de ida, si queréis planificar correctamente esta excursión deberíais multiplicar por dos tanto la distancia como el tiempo.


Summary // Resúmen:
- Short and nice activity on the one to Milford-sound. The road from Te-Anau to Milford is full of small activities such as Marian Lake, which we can enjoy to have a break after a many hours drive down here. // Corta pero preciosa actividad en el camino a Milford sound. La carretera de Te-Anau a Milford está llena de pequeas actividades como ésta que podemos aprovechar para descansar un poco después de tantas horas de conducción para llegar a los fiordos.
- The trek is very easy for experienced hikkers, but after rainy days, it might become slippery and muddy. // El camino es bastante fácil para senderistas medianamente experimentados, pero después de días lluviosos puede estar un poco resbaladizo y embarrado.

sábado, 26 de diciembre de 2015

New Zealand - Arthur Pass - Castle Hill

Track Description / Características de la Ruta:

Distance / Distancia: 2.35km
Elevation Gain / Ascenso: 62m
Max / Min Altitude:  704m / 642m
Difficulty / Dificultad: Easy/ Fácil
Alpine Grade: S.D. (Sin dificultad)
Activity: Hiking / Senderismo 
Recommended Cartography / Cartografía Recomendada: 


Arthur Pass National Park is one of the first National Parks in New Zealand. It is in the core of the Southern Alps, dividing the western and humid regions from the Eastern and dry flatlands of the East. We intended to climb Avalanche Peak, one of the most reputed (although demanding) activity in the National Park, but the weather was horrendous on the West side. So, we changed our mind and went to Castle Hills, in the East side, where the weather is milder. // El Parque Nacional de Arthur Pass fue uno de los primeros de Nueva Zelanda. En el corazón de los Alpes del Sur, el parque divide las húmedas regiones del Oeste de la isla de las planas y secas llanuras al Este. Nuestro plan para aquel día era ascender al Avalanche Peak, una de las ascensiones más famosas de la zona, pero el tiempo, lluvia y mucha niebla, nos hizo cambiar de opinión. En su lugar, vimos en el fácil paseo de Castle Hill una alternativa, dado que, al estar situado en el lado Este de la Cordillera, el tiempo era mucho mejor.

Castle Hill is a limestone rock formation which was uncovered in the surface. Located in a private terrain, in the middle of cattle meadows, it is just an easy 1-2 hour accessible walk. There is not an special marked path, so you can walk as long as you want and decide the difficulty of your activity. // Castle Hill o la colina del castilla, es una formación de roca caliza que fue descubierta en la superficie. Está situada en un terreno privado, en medio de pastizales, y se puede recorrer en una fácil caminata de 1 a 2 horas. No hay un camino marcado, por lo contrario, puedes ir por las zonas que veas más convenientes en busca de las formaciones rocosas que más te gusten.

The area has as well some climbing equipped sections, and a zone for bouldering. Please read the doc website for climbing regulation. // La zona también tiene algunas secciones equipadas para practicar escalada deportiva, así como bouldering. Por favor, antes de escalar, recomiendo leer la regulación de la práctica en la página web del DOC.

Very close to the Castle Hill, we have the Cave Stream track, another interesting activity, but in this case, speleology equipment is required. // Muy cerca de Castle Hill, también tenéis el Cave Stream track, otra interesante actividad de espeleología. Desgraciadamente, hace falta el equipo correspondiente para realizar la actividad, así que no pudimos...

Have a look at the pictures below... // Dejo algunas fotos que tomamos en Castle Hill


Climbing Route Camino para Excentricos (A.D.+ // max IV+) - Peña del Cuco

Track Description / Características de la Ruta:

Distance / Distancia:  8.05km
Elevation Gain / Ascenso: 530m
Max / Min Altitude:  1831m / 1351m
Difficulty / Dificultad: Difficlt / Dificil
Alpine Grade: AD+ (IV+ max)
Activity: Climbing  / Escalada
Recommended Cartography / Cartografía Recomendada: Sierra de Guadarrama - Editorial Alpina.


Some months before, proffiting from the shade of La Barranca Valley in August, we went for a walk to Peña del Cuco to do some research to check how difficult the climbing routes were. I had read an interesting article in Altitud, the climbing magazine of the Federación Montaña Madrileña, and I thought the climbing route was attainable for my climbing level. Once we did this research job, we waited for the colder weather to come to climb the route. I did not find a lot of information about our climbing route, Camino de Excentricos at Peña del Cuco. The most useful links I found are: http://antonio-segundatemporada.blogspot.com.es/2014/08/pena-del-cuco-navacerrada.html and http://www.esferavertical.com/2015/08/pena-del-cuco-navacerrada.html // 
 // Algunos meses atrás, aprovechando la sombra del Valle de La Barranca en Agosto, nos habíamos acercado a este paraje para investigar cómo era Peña del Cuco. Habia visto una reseña en la revista de la Federación Madrileña de Montaña (Altitud) y parecía interesante a la par que adsequible para nuestro nivel. Una vez habiendo reconocido el terreno, dejamos para los días más frescos el hacer la Clásica más fácil de Peña del Cuco, Vía o Camino de Excéntricos. En la web no encontré mucha información sobre esta vía, siendo las dos fuentes que más interesante me parecieron, además del croquis de la revista Altitud, los post en los siguientes blogs: http://antonio-segundatemporada.blogspot.com.es/2014/08/pena-del-cuco-navacerrada.html y http://www.esferavertical.com/2015/08/pena-del-cuco-navacerrada.html


The approach to Peña El Cuco is explained in a previous post, you can read the information here. Likewise, you can approach the climbing route from Puerto de Navacerrada, through a shorter and less steep path. // La aproximación, como en el post anterior, la hacemos desde el Valle de La Barranca. Igualmente se puede hacer desde el Puerto de Navacerrada, un poco más corto y con menos desnivel a salvar. No nos pararemos mucho a describir la subida ya que la podéis consultar en la antigua entrada.


Once we see Peña del Cuco, we approach the start of the climbing route through the North face. // Una vez visualizamos Peña del Cuco, la rodeamos para aproximarnos por su cara Norte.


South Face of Peña del Cuco. // Cara Sur de Peña el Cuco

The most interesting sketches I have found are these two below. // Las reseñas y croquis más interesantes que encontré al respecto son estos dos:


Sketch / Croquis de antonio-segunda temporada: http://antonio-segundatemporada.blogspot.com.es/2014/08/pena-del-cuco-navacerrada.html

Page 37 of the Altitud magazine number 28, you can download the magazine in the next link. // Página 37 de la revista n28 Altitud, que podéis consultar en el siguiente enlace: http://fmm.electura.es/altitud/pdf/Altitud-FMM_n28.pdf#page=36


The climbing route Camino para Excentricos is a traditional climbing route, with max difficulty IV+/V (I have seen both degrees). In any case, the most difficult pitch can be lowered in level to III+ as we overcome the wall through the South Face. If we decide to climb directly through the buttress, we might find a IV+ or V degree. So, we can decide how to overcome this first pitch depending on our climbing level.  // Vía o Camino para Excentricos se trata de una vía de Escalada Clásica, cuya máxima dificultad es un IV+/V (he visto las dos graduaciones). En cualquier caso tiene la ventaja que el largo más dificil, que está al inicio, puede rebajarse fácilmente de dificultad. Si nos encaramos directamente por el espolón de Peña el Cuco la dificultad asciende hasta V, sin embargo, si nos vamos yendo hacia la cara sur la dificultad baja hasta el IV o incluso a III. Así que podemos decantarnos por un itinerario o por otro en función de nuestra destreza escalando.

The climbing gear we used for this activity was a 70m climbing rope (more than enough), some slings and some cams to protect the first pitch, which is the most exposed. // Para realizarla usamos una cuerda de 70m (sobra), lazos y cintas, y algunos friends para proteger especialmente el primer largo, que es el más expuesto.


Once we reached the first anchor point R1, the views of La Barranca Valley are amazing. // Una vez pasado el primer largo, en la R1, las vistas del Valle de La Barranca son impresionantes.


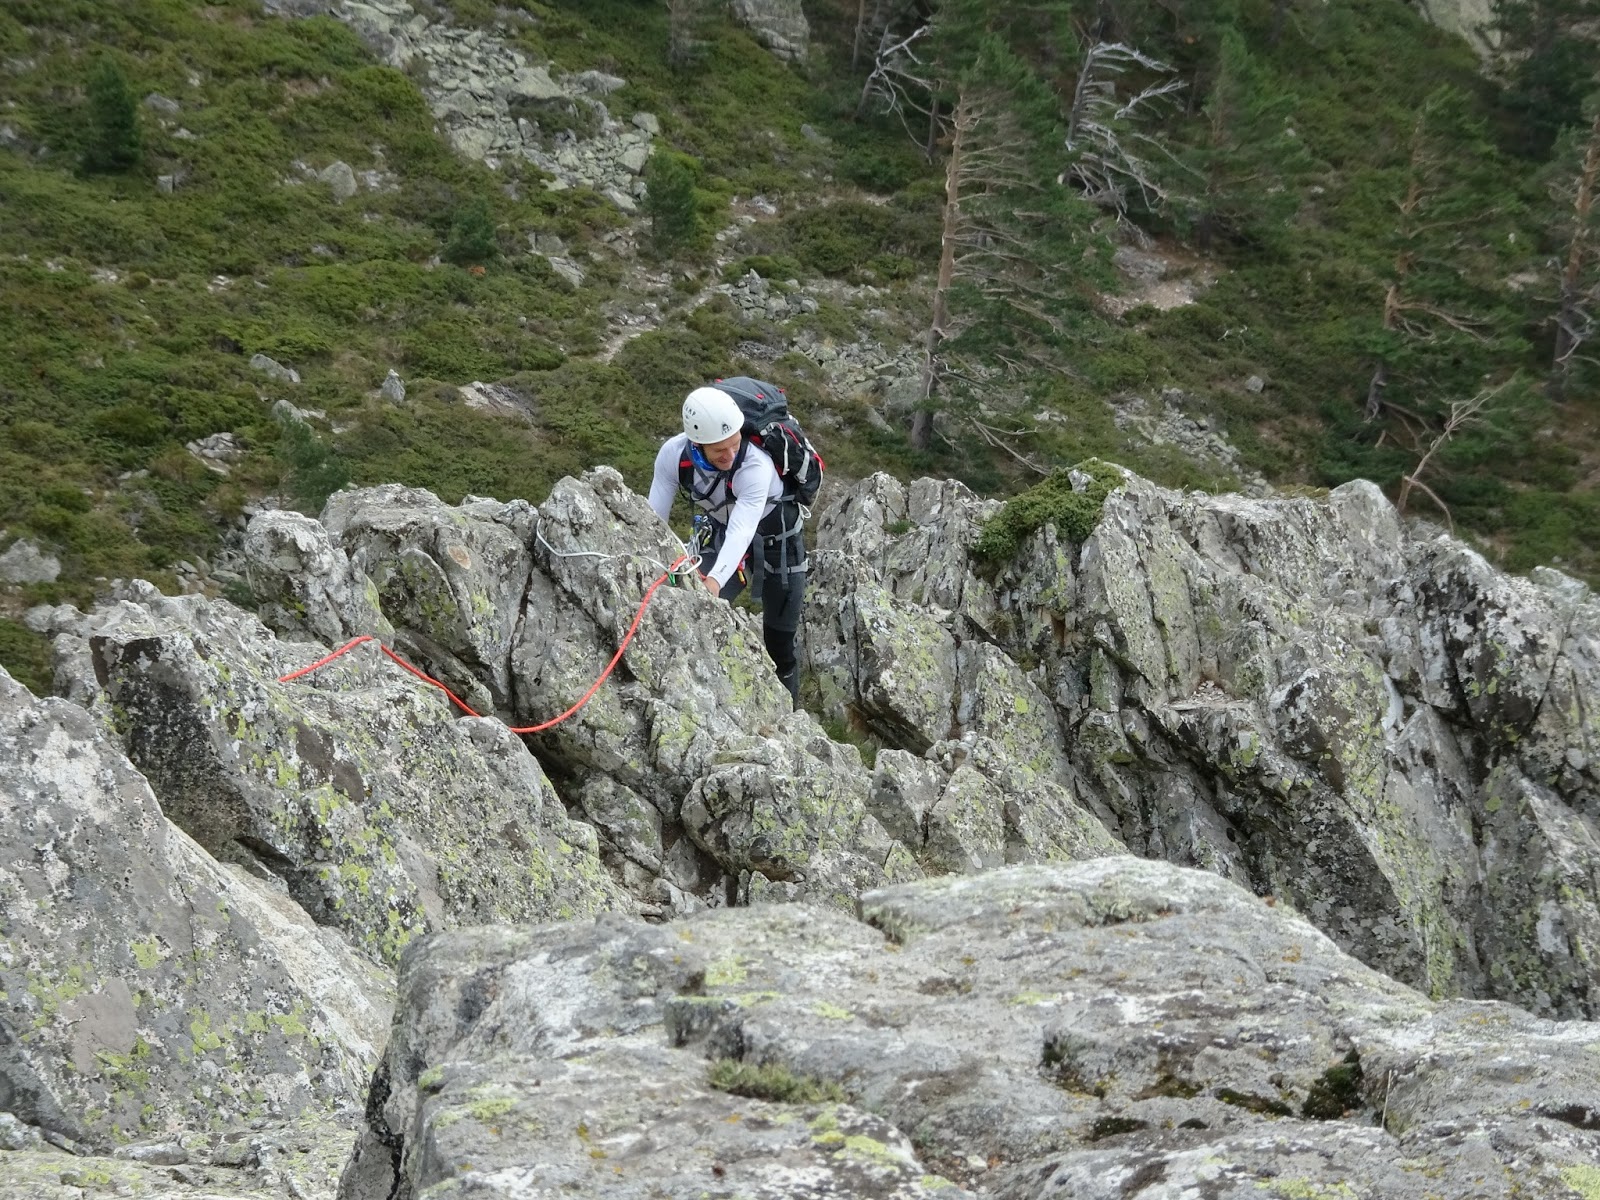
After the anchor point R1, the climbing level descends considerably. The climbing route advances using the ridge of Peña del Cuco, where we will have to traverse two small cracks. The belaying can be easily done using the rocks of the ridge, which give us good oportunities to place slings. // Pasada la primera reunión R1, el nivel baja considerablemente. La vía avanza por la arista de Peña del Cuco, debiendo atravesar un par de brechas fáciles. El aseguramiento puede hacerse fácilmente aprovechando los salientes de roca de la arista.


Once we reach the last anchor point, we can safely walk to the path back to the parking. // Una vez lleamos a la ultima reunión, la bajada al camino de vuelta puede hacerse andando directamente.


Summary // Resumen:
- Traditional climbing route, max IV+, where we can lower the level of the climbing to III+ depending on which side we climb, either the buttress of Peña el Cuco or the South Face. Easy ridge to learn this kind of techniques before embarking in more ambitious projects. // Vía de Escalada Clásica max IV+, donde podemos modular la dificultad máxima del primer tramo según la afrontemos por el espolón o más por la cara norte. Fácil arista, terreno ideal para aprender e iniciarse antes de embarcarse en proyectos más dificiles.
- Amazing views and landscapes. The valley is usually sheltered from the wind, but, at the elevation of Peña del Cuco it starts to sneak in between the surrounding mountains. Likewise, the Valley is in the shade during summer afternoons, so, it is a nice place for the hottest days of summer. //  Vistas y entorno espectacular. El valle está normalmente bastante resguardado del viento, aunque a la altura de Peña del Cuco el viento puede empezar a soplar. Igualmente, el Valle recibe bastante sombra en las tardes de verano, con lo que es un lugar ideal incluso en los días más calurosos.
- There are a couple of water sources on the way up, I would not recommend to drink water directly from the water streams, since there is a lot of cattle in the area. // Existen un par de fuentes en la subida por el Valle, no se recomienda beber de los arroyos dada la cantidad de ganado que hay por la zona.


Mount Montón de Trigo from Dehesas de Cercedilla

Track Description / Características de la Ruta:

Distance / Distancia:  11.8km
Elevation Gain / Ascenso: 999m
Max / Min Altitude:  2161m / 1200m
Difficulty / Dificultad: Moderate/ Moderado
Alpine Grade: Sin Dificultad
Activity: Hiking / Senderismo
Recommended Cartography / Cartografía Recomendada: Sierra de Guadarrama - Editorial Alpina.


With this activity we will discover Mount Montón de Trigo (2161m), starting from the village of Cercedilla. The original idea was to ascend up to La Pinareja and Peña del Oso another 2000s peaks in the area, but the day was overcast and we cannot even see these two mountains with the fog. The name of the mountain stems from the fact that, seen from Segovia, the mountain reminds us to a pile of wheat, given its conical shape and the small blocks of granitic rock. // Esta actividad nos llevará hasta el Montón de Trigo (2161m) desde el parking de Las Dehesas de Cercedilla. La idea original era hacernos también La Pinareja y Peña del Oso, pero el día salió nublado y lo dejamos para otro día por que estas dos montañas estaban cubiertas de niebla. El nombre de la montaña tiene su origen en la forma de la misma, especialmente desde la parte Segoviana, dada su similitud con un montón de trigo por su forma cónica y sus bloques pequeños de roca granítica.

The ascent is done using the well-known Calzada Romana, a path dating since the Roman which used to communicate the two sides of Sierra Guadarrama. // La subida la realizamos por el archiconocido camino de La Calzada Romana.


After almost 600m elevation gain, we reach Puerto de La Fuenfría (1769m), a mountain pass and an important crossroad. The mountain pass was used by Romans to connect the two Mesetas (North and South plateaus). The path on the right will lead to Collado Ventoso and Siete Picos, using the Carretera de la República. The path on the front will descend to Segovia, and it is actually the Saint Jaques way from Madrid. Finally, the path on the left, La Vereda del Infante, roves the hill sides of Peña Bercial and La Peñota. // Tras casi 600m de desnivel, llegamos al Puerto de La Fuenfría (1769m), cruce de caminos por donde pasa el Camino de Santiago. El Puerto lo usaron los Romanos para conectar las dos mesetas. A nuestra derecha el camino se dirige, por la carretera de la República, hacia Collado Ventoso y Siete Picos. Al Norte, bajamos a la Meseta Norte, y a la izquierda la Vereda del Infante nos llevaría por las faldas de Peña Bercial hasta la Peñota. 

We leave the path and ascend directly to Cerro Minguete (2025m). // Nosotros salimos del camino y ascendemos directamente hasta Cerro Minguete (2025m).


As we gain elevation, the surrounding summits show up, as well as amazing views of La Fuenfría Valley, the one we used to ascend. In a clear day, we could even see Peñalara and Gredos. // A medida que cogemos altura las cumbres de alrededor van apareciendo, así como las vistas a todo el Valle de La Fuenfría por el que hemos ascendido y el Monte de Valsaín en el lado Norte. En un día despejado podríamos ver hasta Peñalara.


There is no need to ascend up to the summit of Cerro Minguete, to our right, we have a small path on the hill side of the mountain which will drive us to Collado Minguete without need to ascend all the way up to Cerro Minguete. Collado Minguete is the mountain pass between Cerro Minguete and Montón de Trigo. // A la subida, en vez de ascender hasta el Cerro Minguete, existe una opción de ladear la cima por el lado Noreste, que nos evita subir unos pocos metros de más, y que nos dejará a la misma altura que el Collado de Minguete, que es el paso que separa el Montón de Trigo del Cerro Minguete.


Once we are at Collado de Minguete, there are two paths. The first one, marked with cairns, roves the hill side of Montón de Trigo and will lead us to Sierra de la Mujer Muerta. Although this was our original purpose of the activity, we will discard this option given that it is overcast and we cannot see the summits. Instead, we ascend directly to Montón de Trigo following the cairns which ascend abruptly to the summit. // Una vez en el Collado de Minguete, existen dos caminos. Uno marcado por hitos y que bordea la ladera Suroeste del Montón de Trigo. Este camino sería el que tendríamos que haber seguido para dirigirnos hacia la Sierra de La Mujer Muerta. Dado que estaba cubierta por nubes, decidimos seguir los hitos de Piedra que ascienden directamente por la ladera del Montón de Trigo hasta la cumbre.


After a well deserved break at the summit, we descend using Northwest to Collado de Tirobarra (mountain pass separating La Pinareja from Montón de Trigo). // Tras un merecido bocadillo en la cima, bajamos por la ladera Noroeste hasta un poco antes  del Collado Tirobarra (que separa La Pinareja del Montón de Trigo).


In the mountain pass, we see the cairns of the path roving the hill sides of Montón de Trigo and which will lead us to Collado del Minguete. // En el collado nos encontramos con los hitos del camino que bordea el Montón de Trigo y que nos llevará de vuelta al Collado del Minguete.


At the end of the day, the clouds covering Sierra de La Mujer Muerta went away and we could finally see the two summits we intended to do. What a shame, we will have to come back some day later. // Al final, las nubes que cubrían la Sierra de La Mujer muerta se despejaron, y pudimos fotografiar las dos cimas que queríamos hacer en el día. Lo dejaremos para más adelante...


Once back at Collado del Minguete, we ascend to the summit (this time we cannot do the shortcut) and follow the wide ridge to Peña Bercial and descend to Collado de Marichiva (the mountain pass dividing Peña Bercial and Pico del Águila). From this mountain pass, we descend directly to the parking place following a path on our left marked by cairns and painted spots on the trees. // Una vez de vuelta en el Collado del Minguete, subimos hasta el Cerro Minguete, continuamos por la Cuerda hasta Peña Bercial, y descendemos, por un camino marcado por hitos hasta el Collado de Marichiva. Desde el Collado, descendemos por el camino marcado que sale a mano izquierda y que nos llevará directamente al Parking donde dejamos el coche por la mañana.


Summary / Resumen:

- Easy activity which we could extent to ascend the 2000m peaks of Sierra de La Mujer Muerta. The mild hill sides of the mountains around make this activity easy in winter time for snow-shoeing. If we plan however to ascend Montón de Trigo in winter time, crampons and ice-axe are compulsory, since the final section of the slopes are usually ice. // Fácil excursión que podemos extender para hacer los dos miles de la Sierra de La Mujer Muerta. Las suaves laderas permiten hacer también la excursión con raquetas de nieve (antención con la subida directa al Montón de Trigo, puede estar helada, con lo que haría falta crampones y piolets).
- There is a water source right at the parking place, Fuente Marichiva. // Existe una fuente de agua junto al parking (Fuente Marichiva).
- In peak seasons, such as summer and snow days, the parking is usually packed, be sure to get there early if you want to get a chance to park the car. // En temporadas muy frecuentadas (veranos, y días de nieve) se recomienda madrugar para tener sitio en el parking de las Dehesas.